care and Exercising After Neck Surgery to improvement and rehabilitation
After surgery, your neck may feel tight and weak. The exercises in this resource will help make your neck and shoulder muscles stronger and more flexible. This will help you regain your shoulder and neck movement and function. Following your doctor’s instructions for when to begin these exercises is important for your recovery. It may also affect how well your shoulder and neck will work in the future.
Candidates for neck disc surgery
You may be a candidate for discectomy if you have:
- diagnostic tests show that you have a herniated or degenerative disc.
- significant weakness in your hand or arm
- arm pain worse than neck pain
- symptoms that have not improved with physical therapy or medication
What happens during surgery?
There are seven steps to the procedure. The operation generally takes 1 to 3 hours.
prepare the patient
You will lie on your back on the operative table and be given anesthesia. Once asleep, your neck area is cleansed and prepped. If a fusion is planned and your own bone will be used, the hip area is also prepped to obtain a bone graft. If a donor bone will be used, the hip incision is unnecessary.
make an incision
A 2-inch skin incision is made on the right or left side of your neck. The surgeon makes a tunnel to the spine by moving aside muscles in your neck and retracting the trachea, esophagus, and arteries. Finally, the muscles that support the front of the spine are lifted and held aside so the surgeon can clearly see the bony vertebrae and discs.
locate the damaged disc
With the aid of a fluoroscope (a special X-ray), the surgeon passes a thin needle into the disc to locate the affected vertebra and disc. The vertebrae bones above and below the damaged disc are spread apart with a special retractor.
remove the disc
The outer wall of the disc is cut. The surgeon removes about 2/3 of your disc using small grasping tools, and then looks through a surgical microscope to remove the rest of the disc. The ligament that runs behind the vertebrae is removed to reach the spinal canal. Any disc material pressing on the spinal nerves is removed.
decompress the nerve
Bone spurs that press on your nerve root are removed. The foramen, through which the spinal nerve exits, is enlarged with a drill. This procedure, called a foraminotomy, gives your nerves more room to exit the spinal canal.
prepare a bone graft fusion
Using a drill, the open disc space is prepared on the top and bottom by removing the outer cortical layer of bone to expose the blood-rich cancellous bone inside. This “bed” will hold the bone graft material that you and your surgeon selected:
- Bone graft from your hip. A skin and muscle incision is made over the crest of your hipbone. Next, a chisel is used to cut through the hard outer layer (cortical bone) to the inner layer (cancellous bone). The inner layer contains the bone-growing cells and proteins. The bone graft is then shaped and placed into the “bed” between the vertebrae.
- Bone bank or fusion cage. A cadaver bone graft or bioplastic cage is filled with the leftover bone shavings containing bone-growing cells and proteins. The graft is then tapped into the shelf space.
- artificial disc replacement. Instead of a bone graft or fusion cage, an artificial disc device is inserted into the empty disc space. In select patients, it may be beneficial to preserve motion. Talk to your doctor – not all insurance companies will pay for this new technology and out-of-pocket expenses may be incurred.
close the incision The spreader retractors are removed
The muscle and skin incisions are sutured together. Steri-Strips or biologic glue is placed across the incision.
care and Exercising After Neck Surgery

General Advice
Following surgery you will need to care for your neck to ensure that the operation is a success and that potential post-operative complications can be minimised. It is important to strike a balance between periods of activity and inactivity. Inactivity can be just as harmful to your neck as over activity.
Lying
A good firm support is usually desirable. You should use one pillow or butterfly two. You are free to move around in bed and by practicing rolling from side to side this will make transferring in and out of bed much easier. It is important to minimise the strain on your neck when getting in and out of bed. To get out of bed, roll onto your side and swing your legs over the edge of the bed whilst pushing up with your arms. Sit on the edge of the bed for a moment before standing up.
Sitting
Following your surgery it is preferable to sit in an upright chair with some head support and try to ensure a good upright posture. You should avoid standing still or sitting for prolonged periods as this will cause your neck to stiffen and your posture to deteriorate. Avoid sitting in soft low chairs as this will lead to your posture becoming rounded, causing your chin to poke forwards placing increased strain on your neck. You may find it useful to place a rolled up towel into the curve in your lower back to provide support and help maintain posture.
Walking
Initially after your operation, your neck may be sore as you move; this may increase over the first couple of days but will then improve. You should aim to walk short distances little and often to ensure your muscles do not stiffen up. Once you are home, try to increase the distance you walk daily, always trying to maintain a good upright posture.
Personal Hygiene
Showers are initially better for you, especially if you are washing your hair, as you should try to avoid long periods where your neck is bent forwards. If you have concerns, please discuss this with the Occupational Therapist on the ward prior to discharge. Initially when washing, you will need to keep your wound dry; the nurse looking after you will be able to advise you on how to do this.
Pain Management
Following your neck surgery, it is likely that you will feel some pain and discomfort as you recover from the procedure. Therefore, it is important to discuss with your GP appropriate pain medication during you recovery period, so that you can manage daily activities.
Driving
Always ensure that your driving position allows you to maintain a good posture. Long distances should be avoided unless interspersed with regular stops. At these stops, get out of the car, walk about and stretch.
Lifting
Avoid lifting heavy objects and also holding items at arms length away from your body. Always use a correct lifting technique, bending at the knees and not at your back . Avoid bending, twisting or leaning movements.
BRACE
The advent of technological advances in instrumentation systems has diminished the need for external immobilization of the neck. However, if your surgeon gives you a neck collar to wear, it usually may be removed for showers and sleep. Soft collars are typically worn only for comfort, and only 1 week or so. Hard collars provide more support, and usually are worn for 4-12 weeks, especially in patients who have specific indications for a longer immobilization period.
Exercises
This section shows the exercises you should do after your neck surgery. Start these exercises only when your doctor or nurse tell you that it’s safe to do them and that your incision (surgical cut) has healed well enough. Do these exercises at least 2 times a day for 3 months. If you’re able to move your shoulder and get full motion of your neck back before 3 months, ask your doctor if you can stop the exercises. If you can’t move your neck or shoulder after 3 months, tell your doctor.
Exercise Tips
Doing exercises after your neck surgery can help you heal after your neck surgery. Follow these tips when doing your exercises.
- Breathe normally and don’t hold your breath during the exercises.
- Do the exercises slowly and smoothly. Avoid fast or jerky movements.
- You may want to check your movements in a mirror to make sure that you have good posture.
- Stop any exercise causes you any pain, nausea, dizziness, swelling, or discomfort, stop right away and call your doctor.
Turning neck stretch

- Gently turn your head so you’re looking up to the right.
- Place your right hand on your left cheek and jaw. Apply mild pressure to give yourself a deeper stretch.
- Turn your head back to look down and to your left.
- Place your left hand on top of your head and gently apply pressure.
- Repeat these 10 times. Then repeat this movement in the other direction 10 times.
Chin tuck

- Sit or stand with your back and head leaning against the wall for good posture.
- Tuck your chin in and try to flatten the back of your neck against the wall.
- Return to the starting position.
- Repeat 10 times.
Side neck stretch

- Sit or stand and point your right arm downward.
- Place your left hand on the top of your head
- Gently pull down your head to the left, to stretch the muscles on the right side of your neck.
- Hold for 30 seconds then release.
- Repeat 5 times.
- Repeat on the other side of your neck.
Shoulder shrugs

- Shrug your shoulders up toward your ears.
- Drop them down.
- Repeat 10 times.
Arm circles

- Sit or stand with your arms at your side, with your palms facing forward and your thumbs pointing to the ceiling.
- Lift your arms up and circle them backwards.
- Return to the starting position.
- Repeat 10 times.
Arm and shoulder retraction
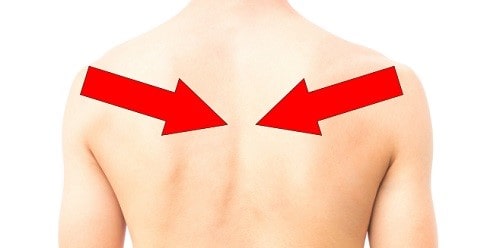
- Sit or stand with your arms in front of you and your thumbs up.
- Move your arms out to the sides, while squeezing your shoulder blades together.
- Return to the starting position.
- Repeat 10 times.
Pectoral stretch using doorway
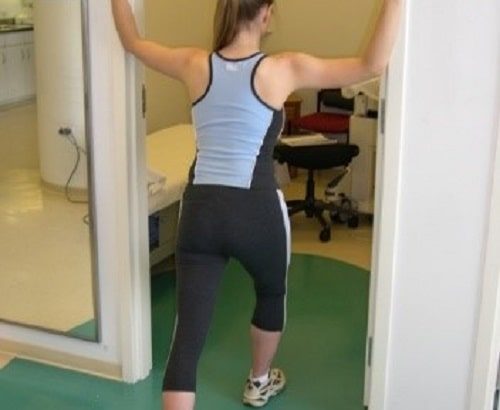
- Stand in a doorway.
- Place your hands and forearms at shoulder level on the sides of the doorway.
- Gently step forward until you feel a gentle stretch across your chest and in front of your shoulders. Keep your back straight and your neck and shoulders relaxed.
- Hold for 30 seconds.
- Return to the starting position.
- Repeat 5 times.
Diaphragmatic breathing

- Lie on your back or sit in a supportive chair.
- Place one or both of your hands over your abdomen (belly, see Figure 9).
- Breathe in slowly and deeply through your nose. Your abdomen should rise but your upper chest should remain still and relaxed.
- Breathe out slowly through your mouth. As you breathe out, slowly and gently pull your abdomen towards your spine.
- Repeat 10 times.